Dark Techno: Mixing Drums

Dark-Techno-Mixing-Drums.png

Intro:

In this blog post, we are going to explore how to mix Dark Techno drums using only Ableton Live 10 stock audio effects. With this tutorial, you'll discover how you can create slamming techno drums without any expensive plugins or third-party software.

First, let's talk about what Dark Techno is. Dark Techno is a sub-genre of Techno that typically has a more ominous and darker sound. The drums in Dark Techno are usually heavy and distorted, with lots of reverb and delay.

With the drum sound design in place, it is now time to start mixing the drums together. The drums them self come from a couple of sources namely the Ableton core drum library ( which you should never overlook) and Mind Flux’s Dark Warehouse Techno pack .

And there is a selection of blog post that will help you create the kick drum and ride/cabasa parts

Grouping:

To start with group the drums together. To do this select all the parts and hit CMD G (ctrl g in on windows). By grouping you can add effects to all the drums at once helping gel them together, it also keeps your screen real-estate nice and tidy.

Screenshot 2018-07-20 10.49.18.png

Remember now in Ableton Live 10 you can group with groups. So it's often a good idea to group your hihat and ride parts together, your claps and snare, percussion parts and kicks (if you have multiple layers). Again to do this simply select the parts you wish to group and hit CMD G.

Screenshot 2018-07-20 10.53.27.png

A good tip if your drum parts are not right next to each other is to hold cmd and then select the parts (this will allow your select none sequential tracks), from there hit CMD G to group them

Drum Buss

To start let's add Ableton’s, new drum buss, which is really your 1 stop shop for drum buss (group) compression and saturation. 

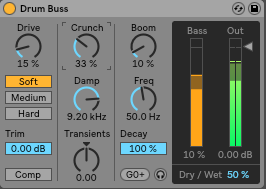
Start by setting the distortion type to medium and drive the input signal by 15%. Now switch on the compressor (comp). If it cooks it to much pull back the trim. 

Now on to the crunch set this to 33%, and in the boom section set the amount to 10%. This is all sounding great but let's bring back in the original signal by dialling the dry/wet back a little bit to 50%.

Screenshot 2018-07-20 10.36.43.png

EQ:

After applying the drum buss it is sounding a little boomy, so start by adding a EQ8. On the 1st band set the mode to HP filter and the frequency to 15Hz. A lot of the boomyness is int the 150-200Hz. So set a bell curve EQ on band 2 and drop it down by -3dB. To add a bit of clarity boost around 2kHz with a narrow Q. In this example the EQ has been placed before the drum buss but do not be afraid to try before, after or both. 

Screenshot 2018-07-20 11.03.34.png

NYC Compression:

Lastly, we are going to apply some NYC compression, so start by creating a new return Aux, load on a compressor. Set the internal EQ side chain to HP filter and the frequency to 145Hz, this will let through the low subs of the kick and rumble bass reverb. 

Now crack up the threshold and ratio, set the attack to 10-15ms to let through the sharp transients and set the release to 80ms which will stop the compressor sounding to flapping and loose. 

Next add an EQ8 with an HP cut and a low and high shelf boost. Around 2dB will do it nicely. From there you will more than likely want to drop the aux return level down a bit and mix it nicely into the track. 

Screenshot 2018-07-20 11.06.30.png

Conclusion:

With techno the genre is all about experimentation and taking sounds in new directions so do not forget to push things to the extreme.

You can download the project file bellow so you can have a detailed look at what is going on. 

And if you liked this post check out our range of other production and mixing tips. 

Previous
Previous

How to make a Grain Harmonizer

Next
Next

Dark Techno Mixing Tips