
Designing Custom Drum Sounds with Drum Synths in Ableton Live
In music production, the drum sounds you use can significantly impact the energy and groove of your track. Custom-designed drums not only help you stand out but also allow you to tailor the percussive elements to fit the unique vibe of your music. Ableton Live’s Drum Synths offer unparalleled flexibility in sound design, giving you extensive control over every aspect of your drums, from pitch and tone to decay and saturation. Whether you’re crafting beats for dance music, hip-hop, or more experimental genres, mastering these tools can elevate your productions to new heights. This guide dives into the intricacies of using Ableton's Drum Synths to create punchy kicks, snappy snares, and resonant toms, and provides tips on enhancing these sounds through layering and saturation.
Step 1: Designing Drums with Ableton’s Drum Synths
Kick Synth: Creating a Punchy Kick
A well-designed kick drum can lay the foundation for the energy of your track. Using the DS Kick from Ableton’s Drum Synth, you can craft a kick drum that resonates with punch and depth, perfectly suited for Techno or any electronic music genre.

Settings:
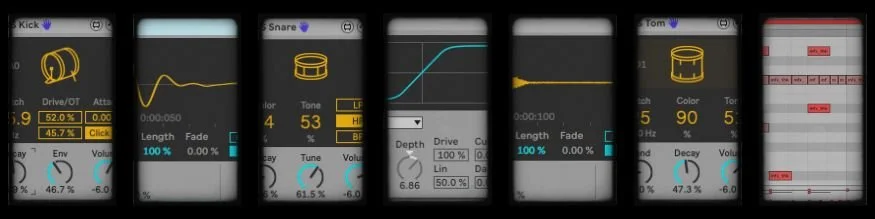
Pitch: 55.9 Hz — This gives your kick a deep, subby foundation, perfect for peaktime techno or deeper styles.
Drive/OT: Drive set to 52.0% adds grit and distortion, while OT at 45.7% provides extra overtones, creating an aggressive, forward-pushing sound.
Attack: Leave it at 0.00% for a quick, sharp transient.
Decay: Set to 54.9%, giving the kick a well-balanced body that doesn’t overpower but sustains nicely.
Env (Envelope): 46.7%, shaping the dynamics of the sound for a controlled punch.
Volume: -6.0 dB for a well-balanced output that leaves room for other elements in the mix.
Pro Tip for Extra Power: To add more sub-bass power and enhance the low-end, consider layering the synthesized kick with a low-frequency sine wave. This technique helps reinforce the deep frequencies without muddying the mix. Additionally, using a transient shaper can further sharpen the attack, ensuring your kick cuts through the mix with more definition.
You can also add dynamic interest by automating the decay during transitions or breakdowns, gradually changing the length to create more intensity or subtlety as needed. For example, shorter decay in a drop provides more punch, while a longer decay in a breakdown adds depth and tension.
Snare Synth: Crafting a Snappy Snare
Creating a snare that cuts through the mix is essential for maintaining energy and drive in your track. A well-designed snare can elevate the groove and provide rhythmic clarity, especially in bass-heavy genres like techno. By leveraging Ableton’s DS Snare Synth, you can fine-tune key parameters to craft a snare with sharp transients and just the right amount of body. Whether you're looking for a short, tight snare for fast-paced rhythms or a snare with a bit more texture, these settings will give your snare the bite and punch needed to stand out. Let’s explore how to dial in that perfect balance between snap and depth using a combination of Color, Tone, Decay, and Filter controls

Settings:
Color: Set to 44% to dial in the right amount of brightness, adding some texture and bite to your snare sound.
Tone: Adjust to 53% for a balanced snare that stands out but doesn’t overpower.
Decay: Set at 15.6% to keep the snare short and punchy, ideal for driving techno rhythms.
Tune: At 61.5%, this helps the snare sit better in the mix, especially when tuned to match the key of your track.
Filter: Use High-Pass Filter (HP) to roll off unnecessary low-end, keeping the snare tight and focused.
Volume: Adjust to -6 dB for optimal balance in the mix.
Pro Tip for Added Depth: For a more textured and full-bodied snare, try layering the snare with a subtle clap or a noise element. This layering technique enhances the depth and character of the snare, providing additional width and texture.
Incorporating parallel compression is another great way to retain the snare’s punch while controlling its dynamics, making it more consistent without losing that vital attack. For a final touch, add reverb sparingly—just enough to give the snare a sense of space without overwhelming the clarity. This method helps create an expansive yet focused snare sound, especially useful for creating tension in breakdowns or adding depth to buildups.
Tom Synth: Designing a Resonant Tom
Tom drums add melodic depth and rhythmic complexity to your track, often bridging the gap between your kick and snare. In Ableton Live, the DS Tom Synth offers a versatile platform for crafting resonant, punchy toms that can sit harmoniously within any mix. Whether you're aiming for deep, tribal percussion or more subtle melodic fills, the Tom Synth provides the flexibility needed to shape your sound with precision. By tweaking parameters such as Pitch, Color, and Decay, you can create toms that are not only impactful but also dynamic enough to fill out the lower and mid-frequency ranges of your track. Let’s delve into how you can use these settings to design toms that enhance the groove and atmosphere of your production.
Settings:
Pitch: 72 Hz (25) – This lower frequency pitch is ideal for creating deep, resonant toms that sit nicely beneath your kick and snare in the mix.
Color: 90% – This high setting introduces a brighter, more present tone, allowing the tom to cut through without overpowering other elements.
Tone: 51% – A balanced tone that adds just the right amount of brightness while retaining the body of the tom.
Bend: 25% – Adds a subtle pitch modulation for a more dynamic sound.
Decay: 47.3% – This setting ensures the tom has a solid attack with just enough tail to give it presence without making it overly boomy.
Volume: -6.0 dB – Keeps the tom well-balanced within the overall mix.
Pro Tip for Enhanced Depth: To give your toms added depth without overwhelming your percussion, apply a subtle reverb. This will add space and atmosphere to the tom without washing it out. For a more organic and realistic tone, try using Ableton’s Corpus effect, which simulates the resonance of physical objects, adding another layer of depth and character to your tom sound.
For an even fuller percussion sound, experiment with layering your toms. For instance, try adding a higher-pitched tom to create more body and complexity. This technique is particularly useful when creating tom fills or tribal-style drum patterns, helping your toms stand out in the mix while still blending seamlessly with your other percussion elements.
Step 2: Layering with Samples
To give your kicks added punch and weight, layering a synthesized kick with a sample like the 707 Kick can work wonders. The key to successful layering lies in ensuring both layers occupy complementary frequency ranges, enhancing the overall sound without causing frequency conflicts. The synthesized kick will provide a strong low-end foundation, while the sample brings additional texture and detail.

Layering Kicks:
To add complexity and weight to your kick, layer your synthesized kick with a sample, like the 707 Kick. Start by ensuring both layers occupy different frequency ranges, so they complement rather than clash with each other.
EQ: Use an EQ to cut frequencies where the layers overlap. For instance, cut the low-end of the sample if your synthesized kick already has a strong sub-bass. Alternatively, let the sample handle the high-frequency snap while the synthesized kick handles the low-end punch.
Blending: Set the 707 Kick sample layer at -3.4 dB to ensure it sits beneath the synthesized kick. Adjust the blend to taste, ensuring the sample adds texture without overpowering the core synthesized sound.
Layering Snares:
A snare that truly cuts through the mix often benefits from layering. By combining the sharp attack of a synthesized snare with the fuller body of a sample, you can craft a snare sound with both precision and warmth. For example, layering the DS Snare with a 505 ASR Snare or History Snare sample adds more dimension, allowing your snare to stand out without overwhelming other elements in the mix

EQ: Use EQ to give each layer its own space. Boost the 505 ASR Snare's low-mid frequencies for body, while allowing the DS Snare to provide the snap in the high end.
Volume Balancing: Place the 505 ASR Snare at -2.6 dB and the History Snare at -6 dB. This ensures that each layer contributes to the snare’s texture without muddying the sound.
Pro Tip for Layering Drum Sounds: When layering drum sounds, always use EQ to carve out space for each layer, ensuring they complement rather than compete with each other. For even greater punch and fullness, consider applying parallel compression. This technique allows you to enhance dynamics while keeping the layers clear and balanced. By carefully blending each layer’s tonal and dynamic characteristics, you’ll create professional-sounding drums that stand out in your mix.
Step 3: Enhancing Drum Sounds with Saturation
Adding Warmth and Punch with Saturation
Saturation Effects: Saturation adds harmonic richness and warmth to your drum sounds, making them more cohesive and dynamic. It simulates the distortion and character imparted by analog hardware, bringing extra life to digital audio. When applied across your drum bus, subtle saturation can help "glue" the elements together, making them sound more unified and punchy.
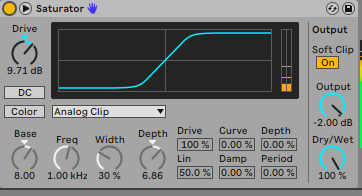
Drive and Tone: The Drive control in Ableton’s Saturator determines the intensity of the saturation applied. Increasing this value adds more distortion, which thickens the sound and adds character. The Tone or Color parameters help shape the frequency response, allowing you to add brightness or warmth to different frequency ranges, such as adding grit to high-end elements or beefing up the low frequencies.
Example Saturation Settings on Kick
Drive: 9.71 dB – This adds considerable grit and intensity to the kick drum, enhancing its punch and presence.
Base: 8.00 – This controls the starting frequency, setting the stage for the harmonic distortion.
Freq (Frequency): 1.00 kHz – Focuses the saturation on mid to high frequencies, giving the kick more presence in the mix.
Width: 30% – Controls the spread of the saturation across the frequency spectrum, affecting the overall character.
Depth: 6.86 – Enhances the amount of saturation applied, bringing more harmonic complexity to the sound.
Drive/OT: 100% (Driven aggressively for an impactful sound).
Soft Clip: Enabled – Soft clipping rounds off the peaks, creating a smoother distortion and preventing harsh digital clipping.
Dry/Wet: 100% – This ensures that the full effect of the saturation is applied to the sound.
Pro Tip for Saturation: For greater control, apply saturation in parallel. This method blends the saturated signal with the original dry signal, giving you the harmonic richness of saturation while maintaining the clarity and punch of the unsaturated sound. Additionally, experiment with different saturation modes—such as Tube for a warm, vintage feel or Tape for smoother, more subtle saturation—to match the sound aesthetic of your genre. This nuanced approach will allow your drums to cut through the mix with warmth and power, without sacrificing clarity or definition.
Further Reading:
For more in-depth tutorials and advanced production techniques, explore the following resources from our blog:
Creating a Raw Techno Bassline in Diva: Learn how to craft a powerful bassline for raw techno using U-He Diva.
Designing Techno Leads with Massive X: Master the art of creating cutting-edge techno leads with Native Instruments' Massive X.
How to Mix Techno Kick and Bass: Discover the key tips for balancing your kick and bass in techno productions.
Evolving Dub Techno Chord in Serum: Step up your sound design with evolving dub techno chords using Xfer Serum.
These resources will help you deepen your understanding of sound design and mixing techniques, complementing the drum design methods you've learned here.
By mastering the art of designing custom drum sounds in Ableton Live using Drum Synths, you can significantly enhance your tracks, making them more dynamic, engaging, and unique. The techniques covered here—ranging from careful sound design to sophisticated layering and saturation—offer you the tools to create professional-quality drums that perfectly fit your music’s style and mood. Remember, the key to great drum sound design is experimentation and refinement, so don’t be afraid to push the boundaries and explore new sonic possibilities.