How To Beef Up Your Drums Part 1

How-To-Beef-Up-Your-Drums-Prt-1.png

In the modern era of music production, we have to worry less and less about recording and sampling our own drums, as there's already a multitude of beautiful pre-recorded drum samples to choose from! But while each sample provides us with the raw tone and foundation, we need to make it our own using processing - but how exactly do we do that? 

In this tutorial, we are going to look at how to beef up our drum loops and samples using Ableton’s stock audio effects. Firstly, we need a beat to work with so, for this example, lets load in the 909 drum rack and create a classic house groove. The beat needs to include a wide range of frequencies (so we get that really full sound), so for low-end use (kick), low mid (toms and snare), high mid (claps) and highs (hi-hat). Though we are using the 909 kit for this example, our macros mean we can re-design the parameters, so this processing rack will work for a large range of drum sounds and loops. 

Beat-01.jpg

Before we start processing, let's go through the rack and just delete any existing processing that is currently there - this will help prevent any confusion and/or over- processing which could damage our end results! 

While we're here, let's just turn down the volume of each drum rack slot - this will ensure we have enough headroom to work with. To do this, simply lower the volume of one drum sound (via the Simpler, which is loaded in the drum rack) and then right click on the volume and choose Copy Value to Siblings.  (Note, this works on all parameters within racks, drums, audio, midi or instrument). 


Copy-Value.jpg

EQ:

With our beat in place lets move on to EQ. We can use the EQ8 to help enhance specific frequencies in the loop. With most Dance and Electronic music the Kick drum pulls most of the weight in a drum loop, so lets start there. 

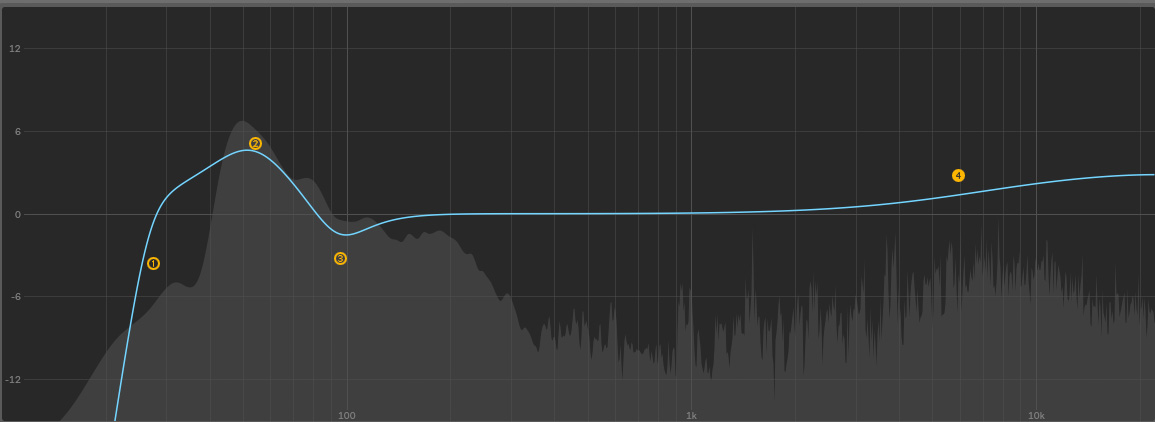
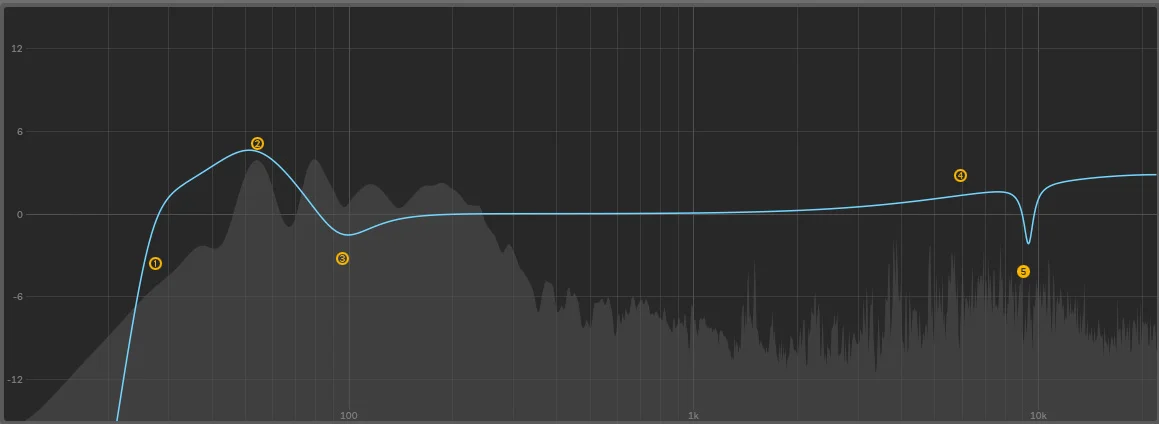
With the first band add a high pass filter (try switching between the 48 and 24 versions, this will give you a steep slope and a slightly smoother slope). Set the filter between 20Hz and 30Hz. This will help to remove any low end rumble that maybe eating up precious headroom. 

eq-cUT.jpg

Now add a bell curve to the second band and boost the root frequency (the note the kick is playing). The best way to do this is crank up the gain of the bell curve and narrow the Q, from there sweep down until the kick sound huge.

EQ-1.jpg

Once you have found that frequency sweet spot, open up the Q and pull the gain below 8dB. If you tend to need huge gain setting on your EQ maybe you need to look at the original sound and try layering or re-recording it. 


With EQ a Yin and Yang approach is always useful, so for every band, we boost lets cut another band. Lets set up band 3 to be a bell curve, boost the gain and narrow the Q. From there sweep through the frequency from around 90Hz - 300Hz. This range will potentially create a rather dirty boomy/boxy sound - we can hear this by boosting the gain of our EQ. 


Now go ahead and cut this band by around 3dB 

EQ-2.jpg
 

Let’s now move to the higher frequencies and look to add some shimmer to the hats. At around 6kHz add a high shelf and boost by around 3dB. This will help emphasise the sizzle quality of the hats. 

EQ-3.jpg
 

You may notice we've also emphasized a horrible ringing in the hats that are particularly painful when you add more compression (which leads you to pull down the level of the hats and then they lost in the mix!). 

But here's the solution, we will use the same technique we did for the kick's 'boomy/ boxy' frequencies and cut that ring. Select a bell curve, boost the gain with a narrow Q and start sweeping the frequency range around 3kHz - 10kHz - You may find several frequencies in there that aren't great, so just pull them down too if you wish. 


Once you find that sweet spot again, pull down the gain. Now you have the hats nice and present in the mix! 

eq-4-ring-cut.jpg
 

We now have pull out the sounds we like and cut the ones we don’t and in the next part of this blog post we will be looking at compression. If you like this blog post and would like to receive more sign up now for email alerts.


Previous
Previous

How To Beef Up Your Drums Part 2

Next
Next

Drum Synthesis: Massive Hats