How to Make an EQ Splitter in Ableton
An EQ splitter is a powerful tool that can greatly enhance your music productions. It allows you to split your frequency bands and apply individual processing to each band, giving you greater control over your mix. In this blog post, we'll be exploring how to set up an EQ splitter in Ableton Live 10 using audio racks.
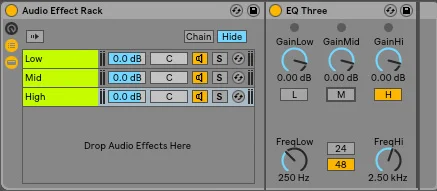
To get started, load an EQ 3 into your Ableton Live project. Of course, if you prefer to use an EQ 8 or any other EQ plugin, feel free to do so. However, for the purposes of this example, we'll keep things simple with three frequency bands.
Once you have your EQ loaded, it's time to set up your audio racks. Audio racks allow you to group together multiple plugins and apply them to a single track. To create an audio rack, simply right-click on an empty space in Ableton's device view and select "Create Audio Effect Rack".
Now open up your chains this will allow us to add more layers to this audio effects rack.
From there let's duplicate the chain 3 times so we have 3 EQ's.
With your EQ’s in place name each chain Low, Mid and High and while we are at it lets set each chain EQ band. In the EQ 3 you will see a Low, Mid and High kill switch. On your low chain just have the Low light up and in the Mid the Mid Light up and so on.
That is our EQ splitter set up now we can look at a great use for it. One great way to use it is to add reverb to bass where you have an huge amount of frequencies but do not want to muddy up your low end.
Open up your high chain and drop in your reverb audio effect. First make sure the EQ section the reverb is switched of and set your dry/wet to just bellow 50% so we have more direct signal than wet. We will set the size and decay to a a medium value size.
Lets also add that to the mid chain but this time take the dry/wet down to bellow 25%
With this splitter, you have complete control over the reverb and the specific frequencies to which it is applied. This feature is particularly useful for time-based effects such as delay, chorus, flanger, and phasers. This technique is versatile and can be applied to a wide range of sounds, substituting the reverb with other audio effects. Keep an eye out for our upcoming blog post, where we'll delve into enhancing our drums.
- how to
- production
- mixing
- Dark Techno
- Label
- Freebie
- Sound A Like
- music we love
- freebie
- Playlist
- Native Instruments
- Minimal Techno
- Massive
- Synth Hacker
- Underground House
- Serum
- Analog Techno
- tutorial
- plug ins
- melodic techno
- Drums
- native instruments
- ableton
- maschine
- massive x
- Techno
- Max for live
- sample pack
- drum synthesis series
- Tech House
- Robot:86
- Sample Hacker
- Diva
- Synth Series
- Ableton Hack
- U-He
- work flow tips
- Music Hack
- midi effect
- Music
- Preset Pack
- From the web
- sound design
- Featured Artist
- top 5
- techno tips


